Install apt-cacher-ng
Author: Sean BarbourAlta3 Let Sean show you how to install apt-cacher-ng:
In DevOps, it is common to reinstall the same system many times within the span of minutes or even seconds. Locally caching the data you need to perform the reinstallation will turn minutes into seconds. I routinely see 50 second downloads reduced to 5 second downloads by caching the data my playbooks need when performing apt installations. In full disclosure, the first download will take 50 seconds, but the hundreds of times that I repeat the download will take less than 5 seconds. On our production network, the numbers are even more dramatic. Try it, you will never look back.
Install Apt-Cacher-NG in your network
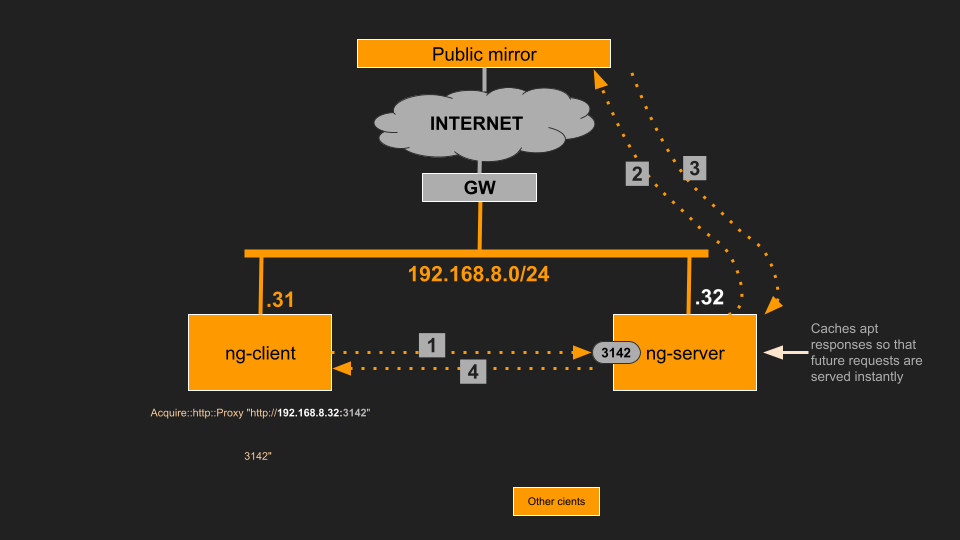
Given: you will need two hosts to demonstrate this. Here are my hosts.
> Server: 192.168.8.32, hostname: ng-server
> Client: 192.168.8.31, hostname: ng-client
-
SSH to the ng-server.
ssh ng-server -
Update package lists and install Apt-Cacher-NG.
sudo apt updatesudo apt install -y apt-cacher-ng -
Here is the only configuration you need in the ng-server.
sudo vim /etc/apt-cacher-ng/acng.confCacheDir: /var/cache/apt-cacher-ng LogDir: /var/log/apt-cacher-ng Port: 3142 PassThroughPattern: .* # passthrough all TLS traffic“Uncomment” the above lines in /etc/apt-cacher-ng/acng.conf.
FYI: ALL https traffic will simply passthrough. apt-cacher-ng is not capable of caching https traffic. :( -
Save and exit the file:
ESC :wq -
Restart the Apt-Cacher-NG service to apply the configuration.
sudo systemctl restart apt-cacher-ng -
Enable Apt-Cacher-NG to start automatically on system boot.
sudo systemctl enable apt-cacher-ng -
Verify that Apt-Cacher-NG is running and listening on port 3142.
sudo systemctl status apt-cacher-ng -
Tail the apt-cacher log in a separate tmux pane.
sudo tail -f /var/log/apt-cacher-ng/apt-cacher.logWe’ll come back later to see if messages are being processed.
-
The server is now ready to act as an Apt-Cacher-NG proxy. Clients can be configured to use this server by pointing their apt proxy settings to:
http://192.168.8.32:3142Of course, replace this IP Address with the correct one.
-
Now let’s configure your client. SSH to the ng-client machine.
ssh ng-client -
Edit apt configuration on the ng-client machine to specify Apt-Cacher-NG as the proxy:
sudo vim /etc/apt/apt.conf.d/02proxyAcquire::http::Proxy "http://192.168.8.32:3142";Use your actual IP address or hostname.
Note: Leave /etc/apt/sources.list AS IS.
The above config forces your machine to use apt-cacher as a proxy. -
Save and exit the file.
ESC :wq -
Update the apt package and install steam locomotive.
sudo apt updatesudo apt install -y sl
Install apt-cacher-ng
-
SSH to the ng-server
ssh ng-server -
Update package lists and install Apt-Cacher-NG:
sudo apt update && sudo apt install -y apt-cacher-ng -
Ensure that Apt-Cacher-NG is configured to service HTTP on port 3142:
sudo vim /etc/apt-cacher-ng/acng.confCacheDir: /var/cache/apt-cacher-ng LogDir: /var/log/apt-cacher-ng Port: 3142This is the default configuration, which should already be in place. Ensure that it is correct.
-
Save and exit the file:
ESC :wq -
Restart the Apt-Cacher-NG service to apply the configuration:
sudo systemctl restart apt-cacher-ng -
Enable Apt-Cacher-NG to start automatically on system boot:
sudo systemctl enable apt-cacher-ng -
Verify that Apt-Cacher-NG is running and listening on port 3142:
sudo systemctl status apt-cacher-ngsudo netstat -tuln | grep 3142 -
Tail the apt-cacher log in a separate tmux pane.
sudo tail -f /var/log/apt-cacher-ng/apt-cacher.logWe’ll come back later to see if messages are being processed.
-
The server is now ready to act as an Apt-Cacher-NG proxy. Clients can be configured to use this server by pointing their APT proxy settings to:
http://192.168.8.32:3142Replace the IP Address with the correct one.
-
Now let’s configure a Client to Use Apt-Cacher-NG on minio. SSH to the client machine.
ssh ng-client -
Edit the APT configuration on the client machine to specify Apt-Cacher-NG as the proxy:
sudo vim /etc/apt/apt.conf.d/02proxyAcquire::http::Proxy "http://192.168.8.32:3142";Use the actual IP address or hostname.
Note: Leave /etc/apt/sources.list AS IS.
The config above forced your machine to use apt-cacher as a proxy. -
Save and exit the file:
ESC :wq -
Update the APT package and install steam locomotive.
sudo apt updatesudo apt install -y sl -
Check the logs you have been tailing on the Apt-Cacher-NG server.
tail -f /var/log/apt-cacher-ng/apt-cacher.log1724174588|I|13772|192.168.8.31|debrep/pool/main/s/sl/sl_5.02-1+b1_amd64.deb 1724174588|O|13454|192.168.8.31|debrep/pool/main/s/sl/sl_5.02-1+b1_amd64.deb -
You should see entries in the Apt-Cacher-NG logs corresponding to the client’s requests.
-
Verify that the client is using Apt-Cacher-NG by running:
sudo apt-cache policy slsl: Installed: 5.02-1+b1 Candidate: 5.02-1+b1 Version table: *** 5.02-1+b1 500 500 http://deb.debian.org/debian bookworm/main amd64 Packages 100 /var/lib/dpkg/status -
Check the logs you have been tailing on ng-server.
tail -f /var/log/apt-cacher-ng/apt-cacher.log1724174588|I|13772|192.168.8.31|debrep/pool/main/s/sl/sl_5.02-1+b1_amd64.deb 1724174588|O|13454|192.168.8.31|debrep/pool/main/s/sl/sl_5.02-1+b1_amd64.deb -
You should see entries in the ng-server logs corresponding to the client’s requests.
-
Verify that ng-client is using ng-server by running:
apt-cache policy slsl: Installed: 5.02-1+b1 Candidate: 5.02-1+b1 Version table: *** 5.02-1+b1 500 500 http://deb.debian.org/debian bookworm/main amd64 Packages 100 /var/lib/dpkg/status -
That’s it. Great job!.
