Part 1: Install and Understand
Author: Joe Spizzandre
Creating the Hugo and ReLearn Project
In this series we’re guide you through the steps necessary to create a personal webpage, hosted via gitlab pages that leverages Hugo and the ReLearn theme. These tools streamline the process of crafting your personal Blog (or any web page). After that we’ll take you through the simple matter of pushing your project to gitlab and hosting it publicly.
The ReLearn theme docs linked above are particularly useful when coupled with the corresponding github repo.
Step 1: Install Hugo
Hugo is compatible across various platforms, detailed on its installation page. We’ll focus on a straightforward installation method for Linux via Debian packages, fetching the latest version from Hugo’s GitHub releases:
wget https://github.com/gohugoio/hugo/releases/download/v0.123.3/hugo_extended_0.123.3_linux-amd64.deb

sudo dpkg -i hugo_extended_0.123.3_linux-amd64.deb

rm hugo_extended_0.123.3_linux-amd64.deb
Step 2: Initiate Your Project
With Hugo installed you could start a brand new project by running `hugo new site [project-name]. This command sets up a new Hugo project ‘from scratch’, however we’re going to cheat and fork the publicly available blog.alta3.com repo from gitlab. This approach pre-installs the ReLearn theme and showcases customizations and configurations to both kickstart your project and educate you on how to go further. Fork the repo (Click on the “Fork” button on the top right of the page, follow the instructions wherein you can change the name if you like), clone your forked repo locally, and fire-up your local version of Alta3’s Blog.
git clone git@gitlab.com:your-username/your-blog-name.git

cd your-blog-name

hugo server --buildDrafts
You should consider opening the blog directory in your IDE (i.e. VS Code) and reviewing the file structure there.
You can now navigate to your localhost:1313 and view the site. It is important to note that as you make update to your site files: configurations, content, etc. your local version of the site will automatically upload. Use ctrl + c to restart the server or ctrl + shift + r in your browser to refresh without cache if updates don’t appear immediately.
Step 3: Learn the File Structure and Basic Configurations
If you explore the Hugo and ReLearn theme docs you’ll find an extraordinary amount of customization options. For the sake of simplicity and brevity we’re going to focus on a few of the changes we made for blog.alta3.com and use those as examples to highlight the internal workings of the theme. After you’ve read through and understand this section you will be fully equipped to strike out on your own and build your own personalized site.
Starting off we will break down the file structure for those of you that haven’t seen a Hugo built project before. The first directory, archetypes/, we can conveniently ignore. These files control how hugo creates new files if you do so through the Hugo CLI commands. My personal suggestion is to skip this step as it saves seconds at best.
The next directory is content/, which is where you will have the most influence and the most changes to make. Let’s take a look at how our content folder is structured and how that translates to what you see on the screen.
Content
├─ _index.md
├─ blogs
│  ├─ _index.md
│  ├─ ansible
│  │  ├─ _index.md
│  │  ├─ [collection of posts]
...
├─ err2fix
│  ├─ _index.md
│  ├─ [collection of posts]
...
├─ tutorials
   ├─ _index.md
   ├─ [collection of posts]
As you can see in the figure the content directory hosts 3 subdirectories: blogs, err2fix, and tutorials. Within blogs are more nested directories, whereas the other two have a collection of posts, which come in the form of .md files. The important note is that each directory has an _index.md. This file serves as both the ‘main’ page of that section, but also contains key configuration data that determines key pieces of behavior for the directory.
Let’s take a closer look at the configuration, contained in the ‘front matter’ of the _index.md file in the ‘blogs’ directory. This front-matter is written in toml. Hugo/ReLearn supports both toml and yaml.
+++
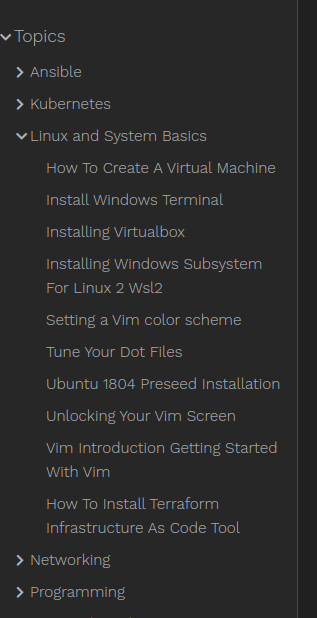
title = "Topics"
weight = 1
alwaysopen = false
collapsibleMenu = "true"
+++The title that you enter into your /_index.md will correspond to the displayed name in the sidebar of the site as well as the display title of the page. The alwaysopen and collapsibleMenu parameters set here ensure that the nested folders and files are not listed in the side-bar by default, but instead come within drop-down lists.

Depending on where the file is located and the type of file (index vs other), the front matter will manipulate different pieces of the overall configuration. These options are exhaustively detailed in the docs but let’s break some of the changes we’ve made that we have already mentioned.
Setting the weight parameter allows you to pick what order the content is displayed. The lower the weight number, the higher up the page. In our example we’ve weighted the order of overarching areas to explore, as well as ordering the Topics directories.
Each post is authored by someone, and that should most certainly be recorded. That information can be recorded in a few places, but we’ve chosen to save it in the headingPost field of the front matter. This will appear directly under the title given in this front matter.
In Err2Fix we’ve used something a bit unique with menuPre to insert a custom logo before the text displayed in the sidebar:
menuPre = "<img src='/images/err2fix-logo.png' style='height:25px; vertical-align: middle;' /> "
We haven’t used this particular front matter yet but the ‘linkTitle =` option would allow you to create a different title display for the side-bar-menu vs the top of the page itself. Helpful if you want to abbreviate the side-bar text.
The layouts/ directory contains various kinds of custom HTML snippets that Hugo will end up using when building the website. The snippets can be used to customize the look of any piece of the site and things saved to this directory will override the same named file in the themes/hugo-theme-relearn-main/layouts directory. This is an important note for site customization so take a moment to let this sink in.
Within our layouts/partials directory we have a logo.html file:
<a id="R-logo" href="{{ partial "relLangPrettyUglyURL.hugo" (dict "to" .Site.Home) }}">
<img src="https://static.alta3.com/images/Alta3-logo_large.png" alt="logo" />
</a>
This custom code snippet controls the logo displayed on the top left of the site. It will be loaded to our site instead of the file found at themes/hugo-theme-relearn-main/layouts/partials/logo.html. You can similarly customize any file found in the Theme’s layouts/partials/ directory to make a highly custom version of the theme. While we don’t do extensive customization for blog.alta3.com, you can get quite sophisticated!
Ignore the public folder. This folder is created when you run hugo server --buildDrafts and is rewritten every time the site is built. It is the folder you will ultimately serve via GitLab Pages to host your site, but even GitLab will end up running the build command and manually rebuilding the public folder at that time. In fact this folder is part of the .gitignore to ensure it’s NOT pushed to GitLab when you push the rest of the repository.
The static/ directory hosts the other piece of user customization: css and images. Please note that images stored here will be in a different directory when the Hugo site is built. Therefore referencing them in your files should not be done by finding their relative path to your content/[topics]/post.md. Always reference images using . We will dig into that more in a bit.
The theme folder contains, shockingly, your themes. Each theme you download will be saved here regardless of use, and each theme contains a multitude of directories and files. In the case of ReLearn we essentially have a self-contained Hugo site that forms the core of our current project. In truth, we’re simply adding to and editing the facade of an already impressive building. And, of course, creating the all important content.
After that the only file to take a deeper look at is the hugo.toml configuration file.
Step 4: Breaking Down the hugo.toml Configuration File
Understanding the hugo.toml file is crucial for configuring your site beyond the basics we’ve discussed. This file is the heart of your site’s configuration, covering everything from basic metadata to theme customizations:
baseURL = 'https://blog.alta3.com/index.html'
languageCode = 'en-us'
title = 'Alta3 Blogs'
theme = 'hugo-theme-relearn-main'
themeVariant = [
	{ identifier = "zen-auto",      name = "Zen Light/Dark", auto = [ "zen-light", "zen-dark" ] },
	{ identifier = "alta3-light"      },
	{ identifier = "alta3-dark"       },
]

alwaysopen = "false"
collapsibleMenu = true
showVisitedLinks = true

[[menu.shortcuts]]
name = "Alta3 Main Site"
identifier = "ds"
url = "https://www.alta3.com"
weight = 10

[outputFormats]
  [outputFormats.search]
    name= "search"
    baseName = "index.search"
    isPlainText = true
    mediaType = 'text/javascript'
    permalinkable = false
    noUgly = true

  [outputFormats.searchpage]
    name= "searchpage"
    baseName = "search"
    isHTML = true
    mediaType = 'text/html'
    permalinkable = false
    noUgly = true


[outputs]
    home = ["html", "rss", "search", "searchpage"]

[params]
    author.name = 'Joe Spizzandre'
    themeVariant = ['alta3-light', 'alta3-dark']
    disableLandingPageButton = true
Thankfully, most of these configurations are self-explanatory. The baseURL serves as foundational metadata, but don’t stress if your site isn’t live yet—you can update this anytime. The language code and title are straightforward, while themes transform the Hugo framework with custom CSS, HTML snippets, and more. Our chosen ReLearn theme streamlines blog organization with pre-packaged themeVariant options, including light and dark modes. We’ve introduced two custom modes that enhance ReLearn’s defaults to match our preferences.
The shortcuts section allows you to create direct links from the left sidebar. These shortcuts can be weighted, and contain depths of information. If you feel like you need a more complicated configuration here, always check back to the docs.
The outputFormats section unlocks one of the most powerful features of ReLearn’s theme: full-site content searching. By default Hugo’s search bar is the disappointing equivalent of a cntrl f search, finding every match only on the current page and highlighting them. By defining these formats, searches yield comprehensive site-wide results, directing users to a dedicated results page.
Finally there are site parameters. These can be used to extensively edit the meta-data displayed across your site. For our example we’ve added an author, theme variants, and disabled a default “Home” button that appears in the top left section. The theme variants have to be enabled here, as we were only defining them earlier. It’s a bit of a loop de loop but the configuration demands it.
For deeper insights, I would also point you to the theme/hugo-theme-relearn-main/exampleSite/config/_default/params.toml file. This is a VERY commented file that explains in great detail what the configuration options include.
Step 5: Content and Customization
At this juncture, you face a crucial decision. Do you want to delve into aesthetic modifications or do you launch into content creation? Either approach is correct; Opting to adjust the CSS first personalizes your site, allowing for content to be seamlessly integrated later. Conversely, populating your site with content first gives it a robust and nearly complete feel, after which you can fine-tune the aesthetics to match your vision. The power is yours.

As for the purposes of this blog, there isn’t much to say about content. You already know how the front matter defines how the titles are displayed. From there you’re simply writing in a markdown file to create your blogs/pages. All normal markdown styling will behave as you expect it to. There are a few notes for embeddings, as they will all work differently from how you might expect.
Images need to be embedded using . This also works for .gifs as you’ve seen earlier on this very page. You can also reference an image URL here if you like. If you want granular control over the size and location of your images you can add styles following a ?, so something like this: 
Videos can be embedded in two ways depending on the type. Generic videos can be embedded as you would normally expect, with html.
<video width="100%"  controls poster="/images/netdevops/Slide4.PNG">   >
  <source src="https://static.alta3.com/courses/mdd/webinar/demo-netdevops.mp4" type="video/mp4">
  Your browser does not support the video tag.
</video>
However if you are linking to a YouTube video specifically you can simply add it with the following built-in shortcut:
{{< youtube liFI3w33tUE >}}
You’ll only need your video’s YouTube extension, or the string after the
v=at the end of the url. This will embed the video nicely for you, without the hassle of writing a bunch of html.
Other than that everything should work as you expect it to. And not to sound like a broken record or anything, but if you run into troubles the docs really are well written for both Hugo and ReLearn.
On the other hand, customization of the site and css follows some specific rules but still feels a bit alien to implement. Let’s take a close look at the layouts/partials and layouts/shortcodes folders and what they are doing for you.
Partials
Partials are like reusable components in your Hugo site’s templates. They help you avoid repeating the same HTML or template code across multiple pages. For instance, you might have a partial for a header, footer, or a navigation menu — elements that are common across your site. Partials are stored in the layouts/partials directory of your Hugo project. When you want to use a partial in a template, you simply reference it with the {{ partial “partialName.html” . }} syntax. This keeps your templates cleaner and more manageable, as you can update a single partial file, and the changes will be reflected everywhere that partial is used. It’s a great way to maintain consistency and efficiency in your site’s design.
Within partials we currently have two files: logo and menu-footer. Each of these contains straight forward html that again, overwrites the ReLearn theme’s html files of the same name within the theme layouts/ directory. Our updated logo file, for example, replaces the ReLearn logo and custom css rules with the Alta3 Logo. This logo file also includes an ‘a’ tag that directs the user back to the home page when clicked (which meant we could disable the home button in our configuration without reducing site functionality).
<a id="R-logo" href="{{ partial "relLangPrettyUglyURL.hugo" (dict "to" .Site.Home) }}">
<img src="https://static.alta3.com/images/Alta3-logo_large.png" alt="logo" />
</a>
In a similar way we’ve taken over the normal footer for the site, and inserted our own Blogroll of affiliate links:
<h3 style="color: rgb(27, 103, 245);"> Alta3 Blog Affiliates </h3>
<a href="https://medium.com/" alt="Medium" target="_blank" rel="noreferrer"><img src="https://miro.medium.com/v2/resize:fit:8978/1*s986xIGqhfsN8U--09_AdA.png" style="height:30px;"/> </a>
<p>Built with <a href="https://github.com/McShelby/hugo-theme-relearn" title="love"><i class="fas fa-heart"></i></a> by <a href="https://gohugo.io/">Hugo</a></p>
In this case we also kept part of the original file, the credit to both Hugo and ReLearn. Any piece of HTML that is defined by ReLearn or Hugo can be changed and customized and included in this folder. In fact you can also define additional custom sections of HTML to be included as well. Doing this requires some additional tinkering however, as you’ll need to insert a reference to your custom HTML snippet into the files Hugo references to build the individual HTML pages.
Specifically you’ll need to find the correct partial within the theme’s directory and add reference to your partial. For example within the ReLearn theme’s partials you’ll find a menu.html that contains the layout for the entire menu section, with a multitude of references to other partials (including menu-footer.html that we’ve made a custom version of to hijack the normally sourced partial). By editing the overarching partial files that control larger portions of the site you can insert your custom HTML snippets anywhere within the site.
Shortcodes
Within layouts we’ll also find shortcodes. Shortcodes, on the other hand, are a Hugo feature that allows you to create simple snippets that you can use within your content files to perform specific functions or display content that would normally require HTML, JavaScript, or other complex code. They are especially useful for content creators who might not be familiar with coding. You can use them for a wide range of functionalities, from embedding videos or images to creating customized buttons or content blocks. Hugo also comes with some built-in shortcodes for common tasks (we’ve seen embedding YouTube videos) but they can also be used in creating custom shortcodes to meet your specific needs. We’ve only done this in one specific spot and for a very generic need of image resizing, shortcodes/imgResize.html:
<img src="{{ .Get "src" }}" alt="{{ .Get "alt" }}" style="width: {{ .Get "width" }}; height: {{ .Get "height" }};">This is a template that will allow Hugo and ReLearn to interpret the img tags placed in your content files and translate them properly when Hugo builds your site. We are currently using this shortcode to control the way our Err2Fix icon appears in the menu. Here is how we have it defined in our content:
+++
title = "Err2Fix"
weight = 2
alwaysopen = false
collapsibleMenu = "true"
menuPre = "<img src='/images/err2fix-logo.png' style='height:25px; vertical-align: middle;' /> "
+++
You can see that from our perspective this looks like normal HTML. The only difference is that it’s located in the front matter of our content and as such needs additional help via shortcode for Hugo to properly interpret it.
CSS
Finally, let’s take a look at how you can customize CSS for your site. As you recall we created a custom light and dark mode that piggyback off the built in ReLearn variants and simply update some of the colors. Let’s take a look at the dark mode:
@import "theme-zen-dark.css";

:root {
    --CODE-theme: zen-dark;
    --MENU-HEADER-BG-color: #003366; /* Background color of menu header */
    --MENU-HEADER-BORDER-color: #003366; /* Color of menu header border */
}

.content h1 {
    color: rgb(173, 216, 230); /* Light blue color */
}
First, we import the entirety of the zen-dark theme that is already defined by ReLearn. This gives us a starting point and saves a ton of time. For any .css variables we want to change, we add them to the :root{} section of our custom css file. We can then further set custom css definitions that reference classes or tags located in any partial (but particularly our custom partials).
As for how you find which css rules control what? That is a bit of reading and a bit of trial and error. If you review the themes/huge-theme-relearn-main/static/css/theme-zen-dark.css file you’ll see it’s conveniently heavily commented, explaining what each variable controls. You can search through this page to find your answers or you can go straight to your browser and inspect the site itself, whichever you prefer.
Remember that when you customize css for the site you’ll want to ensure your hugo.toml configuration is pointed properly towards your new theme. If you create a new theme from scratch remember to name it theme-[theme-name].css and to reference [theme-name] in your hugo.toml.
And that’s all folks.
You have downloaded Hugo, cloned and launched a local version of our blog site, and learned the basics of what it will take to make it your own. From here you have some work to do, deleting the now extraneous blog content, renaming directories, customizing css and partials, creating and adding your own content, and more. In the next part of the series we’ll take what you have built, and get it hosted on GitLab Pages, for free. The best part is that this can be done before you’re finished! As long as you don’t mind having a ‘work in progress’ hosted, you could jump to Part 2 right now and get started on the CI/CD pipeline. We’ll see you there when you’re ready.