Install Windows Terminal
Author: Stu FeeserOne of the main reasons to run a local copy of Linux is to replace putty and other tools with a real Linux terminal. Take the time to get your terminal working well for you.
Tasks:
-
Proceed with the next steps, ONLY if you already have Windows terminal installed. Notice that some of the GUIDs will change and you will need to restart the terminal completely in order to get the new entries auto-loaded into the config. We observed there was no ubuntu until AFTER restarting the Windows terminal completely. Then the config magically appeared.
-
Install Windows terminal. Click here for the link.
-
Launch your Windows terminal! At the top of the window, click the
Vdropdown button and select Ubuntu. This will open an Ubuntu Linux tab.
-
Edit the settings file in Windows terminal which is accessed via the
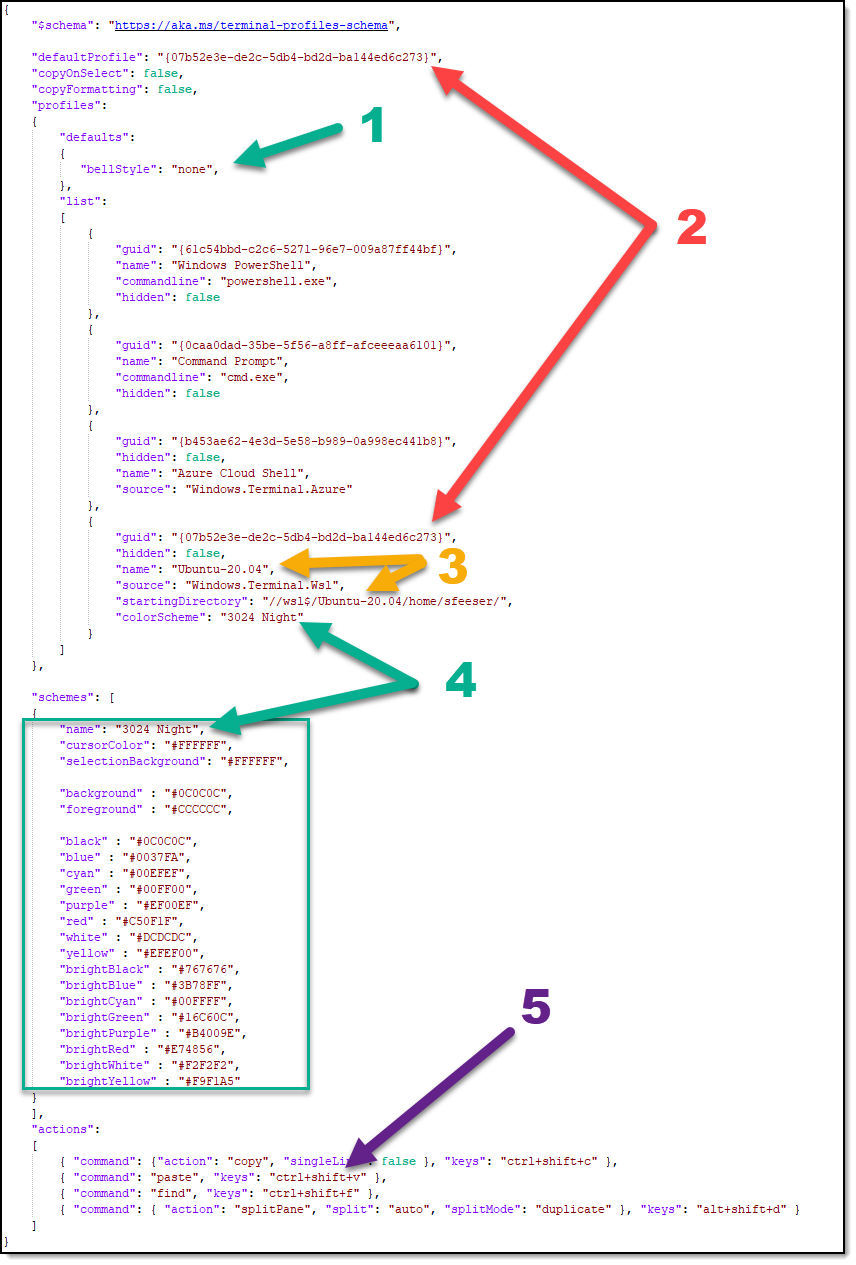
Vdropdown button. You need to make this change so that you can use ctrl+v for vim block commands. The line you want to edit looks like this{ "command": {"action": "copy", "singleLine": false }, "keys": "ctrl+c" },and is around line 75. The trick is to change"keys": "ctrl+c"to"keys": "ctrl+shift+c"in that line. If you do NOT make this change, Windows hogs the ctrl+v command for paste, breaking alot of vim tricks. Below are the four changes to make within the settings file. The image below these items shows what you want to change.-
Step 1 - Turn off that annoying bell sound!
-
Step 2 - Make the GUID of the
defaultProfilematch the GUID of the Ubuntu profile. PowerShell will launch by default, so making this change will set Ubuntu to launch by default. -
Step 3 - If you want your home directory to be
~then you need to match that path with the"name":of the Ubuntu profile. In this case, that isUbuntu-20.04. -
Add a color scheme if you don’t like the one that ships with Windows terminal. There are many of them here.
-
{ "command": {"action": "copy", "singleLine": false }, "keys": "ctrl+shift+c" },(all you have to do is add the word shift in between the ctrl+c and the ctrl+v on both of those lines, so your end result would be ctrl+shift+c and ctrl+shift+v as shown in the image below.
-
-
Now all you have to do is save from whatever editor you opened the file with. Close out of all Windows terminal sessions and open a new one. You should see your changes appear right away.
-
It might also be a good idea to pin the Windows terminal to the taskbar.
-
Remove the irritating CLI BELL by editing the /etc/inputrc file.
$echo 'set bell-style none' | sudo tee -a /etc/inputrc -
Get rid of the vim bell too. This creates a .vimrc as it will not be there on new installations.
vim .vimrcset belloff=all -
Consider copying all of this to root as when you run sudo vim, the BELL is BACK because the root .vimrc is referenced and in that case the bell is not turned off.
Now, your Linux terminal should be all set and ready to go.